How to Make Your WordPress Website Accessible
You’ve likely heard about accessible websites and may be wondering how to make your WordPress website accessible.
If you are just starting down this path, take a moment to read my earlier post on why you need an accessible website.
In that post I cover:
- The Americans with Disabilities Act (ADA)
- Web Accessibility in Mind (WebAIM)
- Web Content Accessibility Guidelines (WCAG)
- Levels of Compliance
- Four Principles of POUR
And I also provide a framework to help you deepen your understanding as to why accessibility is not an option but a requirement for all website owners.
My hope for this second post is to guide you on how to make your WordPress website accessible.
We’ll look at a few tools that can help, and we’ll discuss a solid approach to identifying and fixing compliance issues on your website.
QUICK LINKS
What is an Accessible Website?
Disclaimer
Website Accessibility Testing and Tools
Getting Started
ADA Checklist
Simplified Checklist
Additional Considerations
Additional Reading
Using the Web Accessibility Tools
WAVE Browser Extension
Web Accessibility Plugin
WP Accessibility Plugin
Accessibility Checker Plugin
Screen Reader Text Format Plugin
What is an Accessible Website?
A website is accessible if it can be used by people of all abilities.
This includes any type of disability that limits a person’s movements, senses or activities including blind, vision impaired, deaf and more.
That’s why it’s important to do our part to make the internet usable for everyone.
WCAG 2.1 has provided us with four functional accessibility principles called POUR.
In short, these four POUR principles help us make our websites accessible with technology that is:
- Perceivable
- Operable
- Understandable
- Robust
I cover these principles in depth in my article on why you need an accessible website.
So if you haven’t already done so, please make sure to read that post first and then come back here.
Later in this article we’ll cover each of these principles as they apply to our websites. I’ll:
- Show you how to approach making your website accessible.
- Provide a checklist and resources to guide you through your site.
- Provide additional reading so you can explore topics in greater depth.
Disclaimer
In full disclosure, I am not ADA certified. But I will make every effort to achieve reasonable effort towards compliance.
You can read my disclaimer in that earlier post.
Website Accessibility Testing and Tools
My accessibility testing is done with common tools such as WAVE and other plugin-assisted ADA tools as well as manual checking.
I’ve heard from many expert sources that no website will EVER be 100% compliant.
In addition, I have learned that no one tool will guarantee 100% compliance.
The tools and tests I use will get you reasonably close to compliance within a reasonable budget. But again, I cannot guarantee that you will achieve 100% compliance.
Additionally, if you are a web designer/developer, you will definitely want to have your clients sign a website accessibility release of liability.
Getting Started with Accessibility Testing
I heard a lot about the Userway free plugin and its paid subscription service, which does continuous real-time accessibility monitoring.
But I decided I’d rather try to fix the underlying issues on my site instead of relying on a plugin.
And if I could get my site reasonably compliant, I wouldn’t need any service to remediate my web pages.
After setting up a development site, I installed the WAVE Browser Extension.
This web accessibility evaluation tool parses your page and reports errors, warnings and alerts. It locates contrast errors, skipped heading levels, empty ALT text, missing form labels and more.
I did my best to fix what I could, then moved on to find additional resources to help.
The remainder of this article will cover what basic checks you need to do to make your WordPress website accessible. And it will guide you on what to correct to get minimum compliance.
ADA Checklist
The following checklist is adapted from WebAIM’s WCAG 2 Checklist. I have modified and simplified it for basic use.
Going through the checklist will help you achieve Level A to Level AA compliance.
As a reminder, be advised that this checklist is not official policy but rather a list of guidelines and recommendations to help you make your WordPress website accessible.
Start with making your home page compliant, then work on your inner pages.
Print this Page
To print this page, install the Print Friendly browser extension by clicking the button below.
Once installed, you can print this page or any article on this website directly from your browser.
Simply look for the printer icon in the upper right corner of your browser.

Simplified Checklist
Perceivable: Make web content available to senses of sight, hearing, touch
Operable: Interface forms, controls, and navigation are operable
Understandable: Information and operation of user interface must be understandable
Robust: Content must be robust enough that it can be interpreted by a wide variety of user agents, including assistive technologies
These items mostly pertain to the theme but listed here for completeness:
Additional Considerations
Additional Reading:
Easy Checks – A First Review of Web Accessibility
Free PDF Accessibility Assessment
A WordPress Accessibility Checklist to Improve Your Site for All Users
20 Web Accessibility Testing Tools & What They Test For
WebAIM’s WCAG 2 Checklist
Using the Web Accessibility Tools
The remainder of this post will explain how to use a few of the web accessibility tools that I have referenced in this post. These tools will guide you as you make your WordPress website accessible.
WAVE Browser Extension
Install the WAVE Browser Extension
I recommend that you install the WAVE Browser Extension instead of running the WAVE Web Accessibility Evaluation Tool online.
That’s because some hosts have a wildcard block which might block the WAVE URL crawl.
And if that happens, you’ll get a 403 permission error. So just install the extension instead and save yourself time.
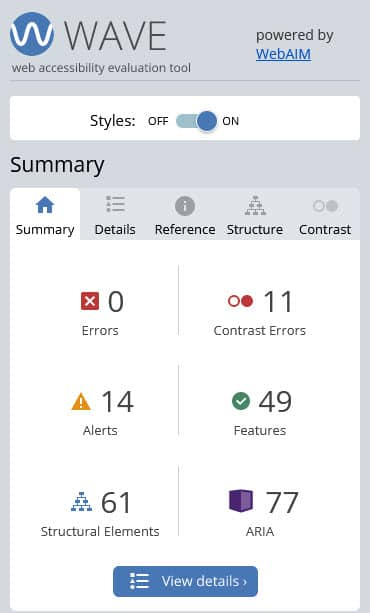
Once WAVE is installed, you will see a “W” icon in your browser bar. Click that and the tool will open a panel on the left side of your web page.
The extension will parse your website page, which will be marked up to show the various errors, warnings, and alerts it found.
Please refer to the screenshot below to see an example.
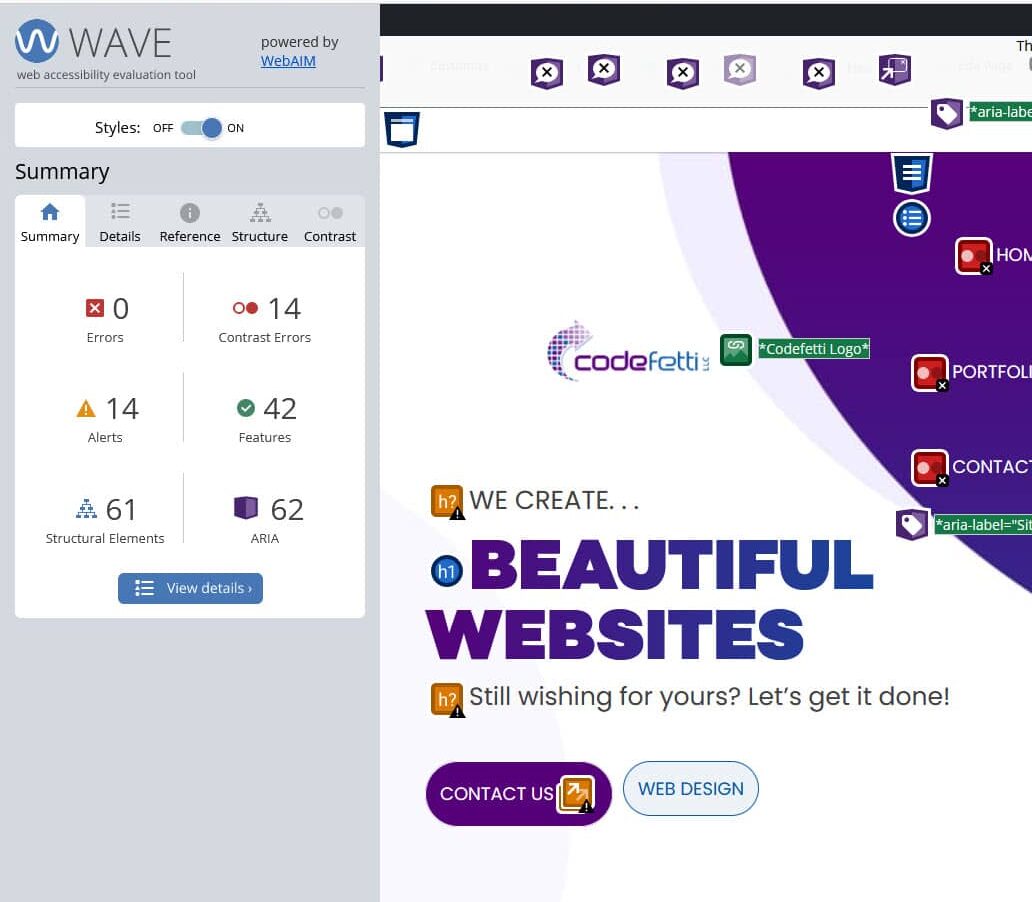
The summary on the left of your web page will report errors and alerts as well as structural elements and aria labels as seen in the screenshot below:
Please note that when you are logged into the WordPress dashboard, you will likely get contrast errors within the dashboard itself.
Those are safe to ignore. What you want to focus on are the errors that the public will see.
Click the Details tab to drill down to the errors:
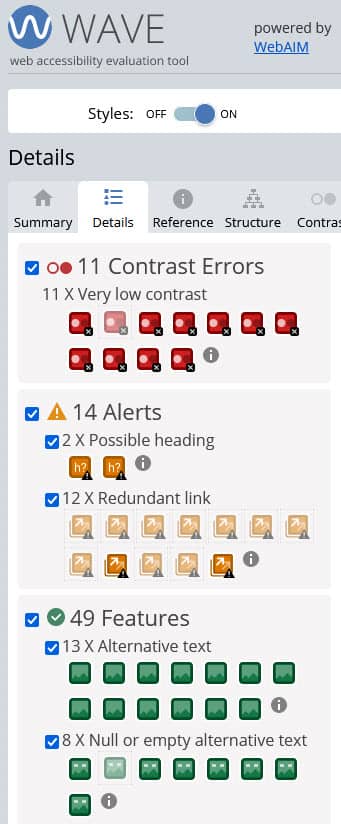
The colored icons shown in the detail tab will correspond to your webpage elements. You can click on any icon in that tab, and it will take you to that element on your webpage and give further information.
In this example, there are 11 contrast errors. That’s because my home page uses white text on gradient backgrounds. For these errors, I needed to manually check color contrast to ensure compliance.
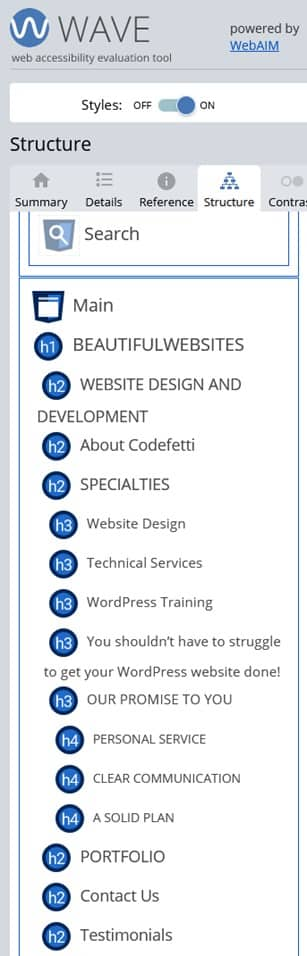
Next click the structure tab to make sure your heading levels are correct:
Then click the contrast tab to test color values that are not compliant and adjust them as needed:
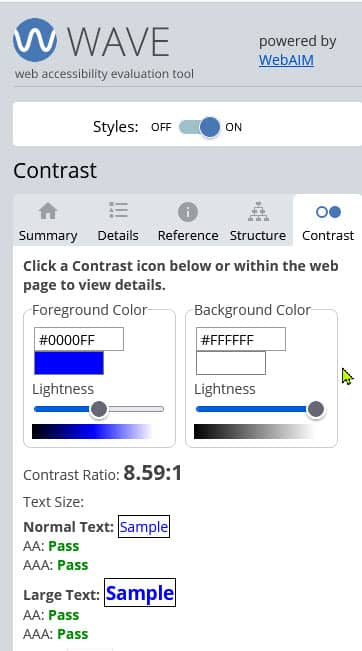
Depending on the underlying theme code, there may be reports of contrast errors that are false positives. In this case, you need to do a manual check of the foreground and background color values.
As mentioned earlier, I found this to be especially true with white text on a colored or gradient background.
ACCESSIBILITY PLUGINS
In addition to WAVE, I worked with the following WordPress plugins to help with my remediation:
And I’ll give a brief overview of these next.
Keep in mind that features of WAVE and accessibility plugins will overlap, so you will not necessarily need every feature of every tool. Find what works for you.
Web Accessibility Plugin
Download the Web Accessibility Plugin
This plugin is quite comprehensive and can be a good tool for finding any missing ALT text and checking color contrast.
As of this writing, the plugin was last updated one year ago. It doesn’t appear to be abandoned, and still offers good results.
Once installed, go to Settings > Accessibility Tools to find this interface:

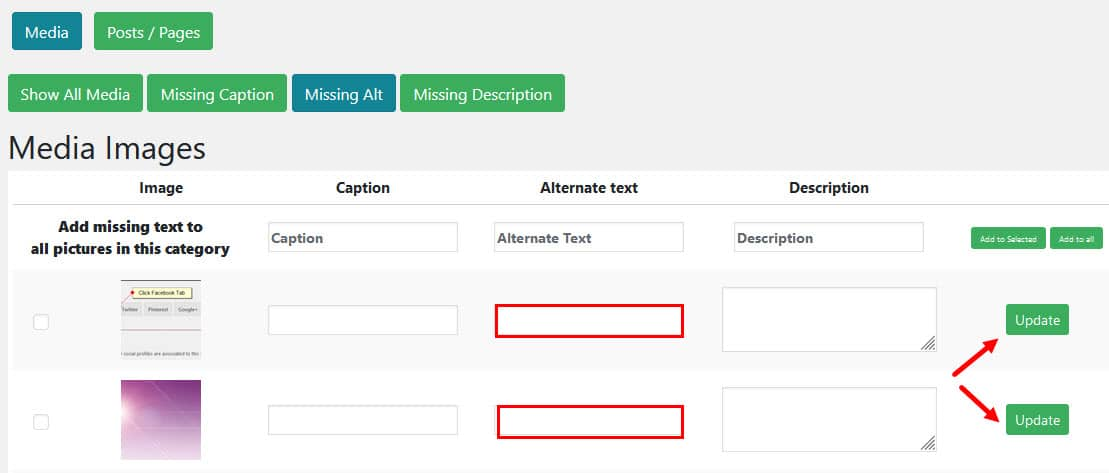
Find Missing ALT Text
Start by clicking the “Missing Alt” green button to identify non-decorative images in your media library that are missing ALT text.
Provide the missing ALT text and click the update tab to make sure the text is saved.
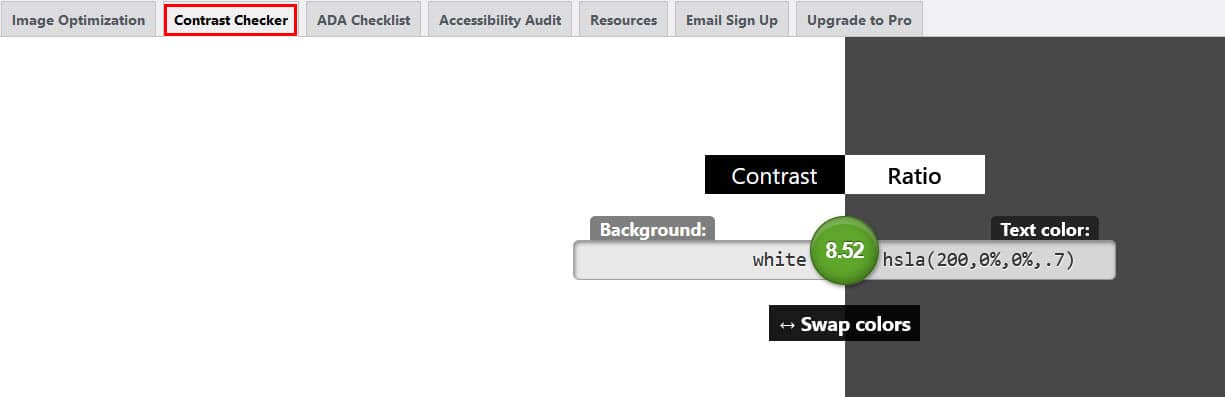
Contrast Checker
The contrast checker tab has a tool where you input background and foreground text colors. The checker will report whether the contrast ratio passes compliance.
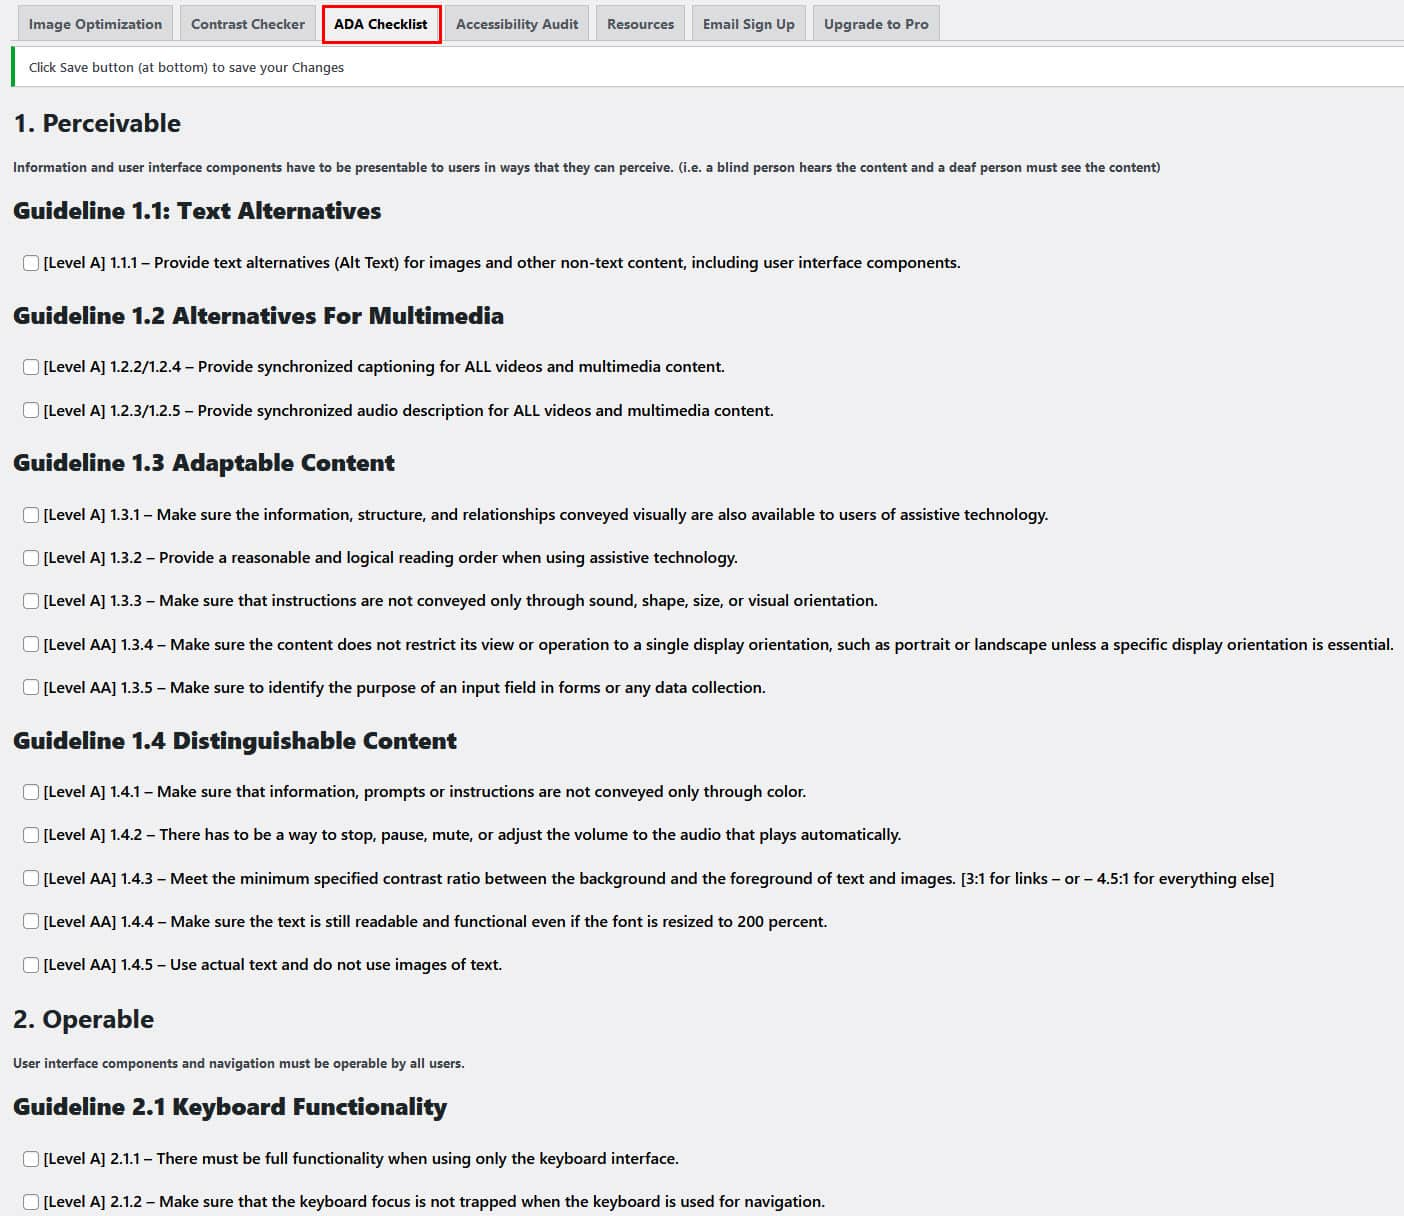
ADA Checklist
Next is the ADA Checklist tab. Here you will find a plugin checklist. Note how the checklist adheres to the four POUR principles we discussed earlier and is an adaptation of WebAIM’s WCAG 2 Checklist.
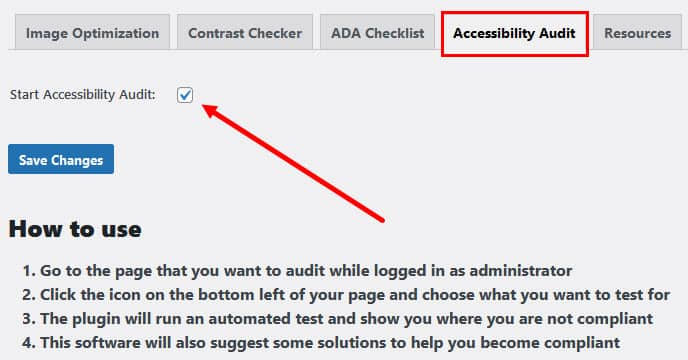
Run an Accessibility Audit
When you install the Web Accessibility plugin, it has a setting to start an accessibility audit.
You can find that setting in the dashboard under Settings > Accessibility Tools:
A small icon as shown below is placed in the lower left corner of your web page:

When you click on it, the following audit menu will display:
Accessibility Audit Menu
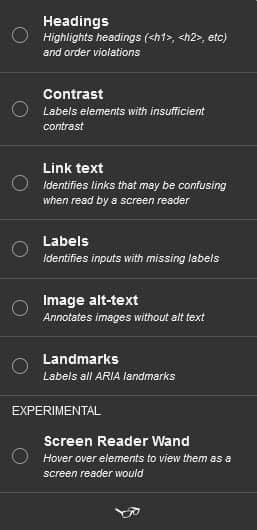
Let’s go through each of these options.
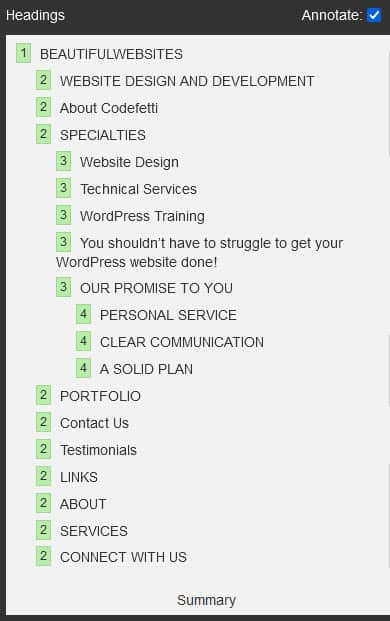
Headings
Click on “Headings” and a report will pop up in the lower right corner of your web page. It will evaluate page hierarchy and report on invalid heading levels:
Contrast
Click “Contrast” and the contrast checker will report on items that do not have sufficient contrast:

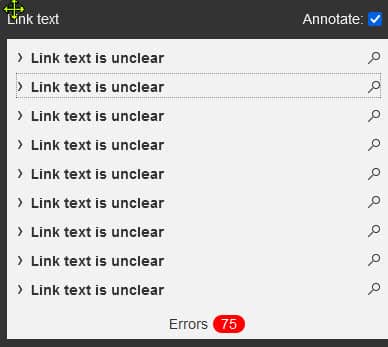
Link Text
Click “Link Text” and get reports on unclear link text.
Many reported errors were outside of my control.
I will update this article as I learn how to deal with this.
The remaining choices are self-explanatory.
Click “Labels” and any inputs with missing labels will be reported upon.
Click “Image alt-text” and any images within the page without ALT text will be flagged.
Click “Landmarks” to get a list of all ARIA landmarks. These landmarks are simply attributes which are added to page elements that allow users of assistive technologies to “skip to” sections of the page more easily.
WP Accessibility Plugin
Download the WP Accessibility Plugin
I highly recommend that you install the WP Accessibility plugin by Joe Dolson.
This plugin covers the gap with accessibility functions currently missing in the WordPress core.
Until these issues are corrected in WordPress core, this plugin will be a valuable tool for you.
It will help you fix issues on your site such:
- configuring skip links
- adding an accessibility toolbar with font size adjustment and contrast toggle
- adding the post title to “more” links so context is clear to visually impaired
- automatically labeling WordPress search form and comment form input fields
- removing target attribute from links (i.e. don’t open in a new window)
- adding an outline to elements on keyboard focus with a color you choose
- checking color contrast
- and more
But first a note of caution. Many WordPress themes just aren’t staying current with accessibility trends.
If you find that your theme is lacking in this area, it may be time to consider a theme revamp and switching to a solid theme that was built with accessibility in mind.
You may be using one of the most popular themes on the planet, and it may fall short when it comes to website accessibility.
Check out WordPress Page Builder Accessibility Comparison by Equalize Digital and see how Kadence WordPress theme scored as the best page builder for accessibility today.
And check the report for surprising results of popular WordPress themes that score poorly for accessibility.
Plugin Settings
Once you’ve installed and activated WP Accessibility, go to Plugins > WP Accessibility > Accessibility Settings.
There are five settings sections with a multitude of options, which we’ll look at next.
But be advised that there is no “one size fits all” so you will need to do your own research and apply the settings that pertain to your WordPress theme and site features.
The remainder of this post shows you what options are available.
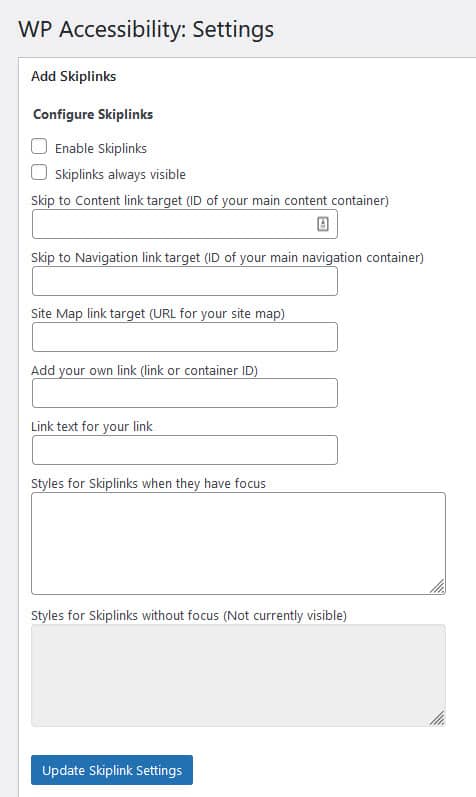
Add Skiplinks
This section will let you enable and configure your skip links, if needed.
Creating skip navigation links is important for screen reader and keyboard users. And a good WordPress theme will have this built into its code.
Usually a single skip link to main content is all that is required. That’s because this skip link will give users the ability to navigate directly to the main content.
However, I’ve seen a trend where sites have 3 specific skip links: skip to navigation, skip to content, and skip to footer.
And that’s what I’ve implemented on my site.
Note in the below screenshot how many options you have for enabling and configuring your skip links.
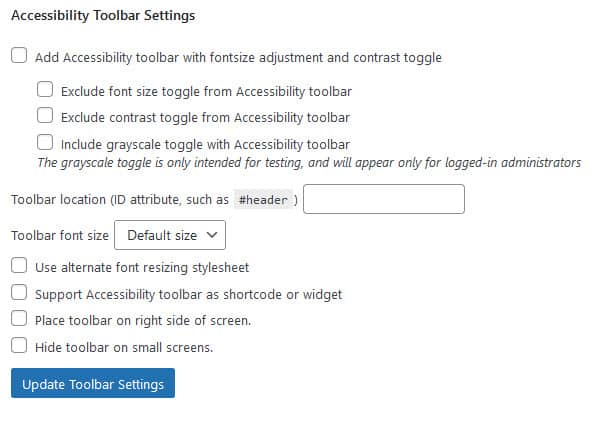
Accessibility Toolbar Settings
This settings section lets you add an accessibility toolbar, which allows your visitor to adjust font size and contrast.
I don’t believe that this is a requirement for ADA compliance, but it might be useful for low vision users of your site.
Miscellaneous Accessibility Settings
This section has some great defaults that you may or may not need to use.
As I mentioned earlier, these settings depend on your theme and website features.
For example, if you run WAVE on your website page and it reports missing labels on your WordPress search or comment form, you will want to check the box to automatically label these forms.
If you have a big site with links opening in a new window, you will want to check the box to remove target attribute from links.
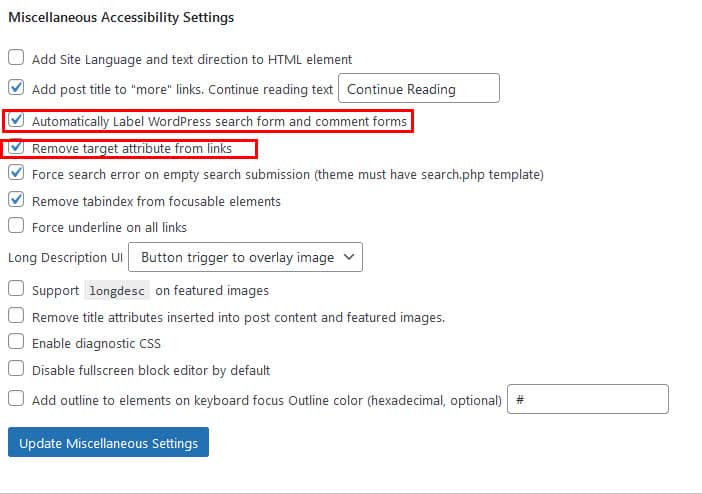
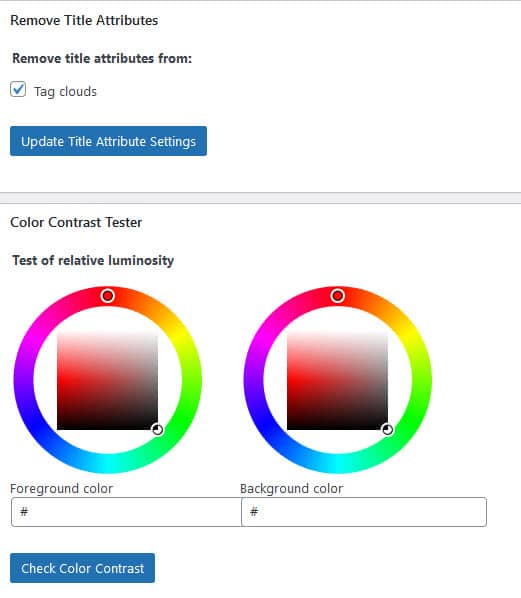
The last two sections provide a way to remove title attributes on tag clouds and check color contrast.
So you see how helpful this plugin can be to help bridge the gap until certain accessibility features are included in the WordPress core.
Accessibility Checker Plugin
Download the Free Accessibility Checker Plugin
What I like about this plugin is that it reports a score of “passed tests” to help you identify common accessibility errors on a website page.
If you scroll down to the bottom of a page you’re editing, it will display the following report:
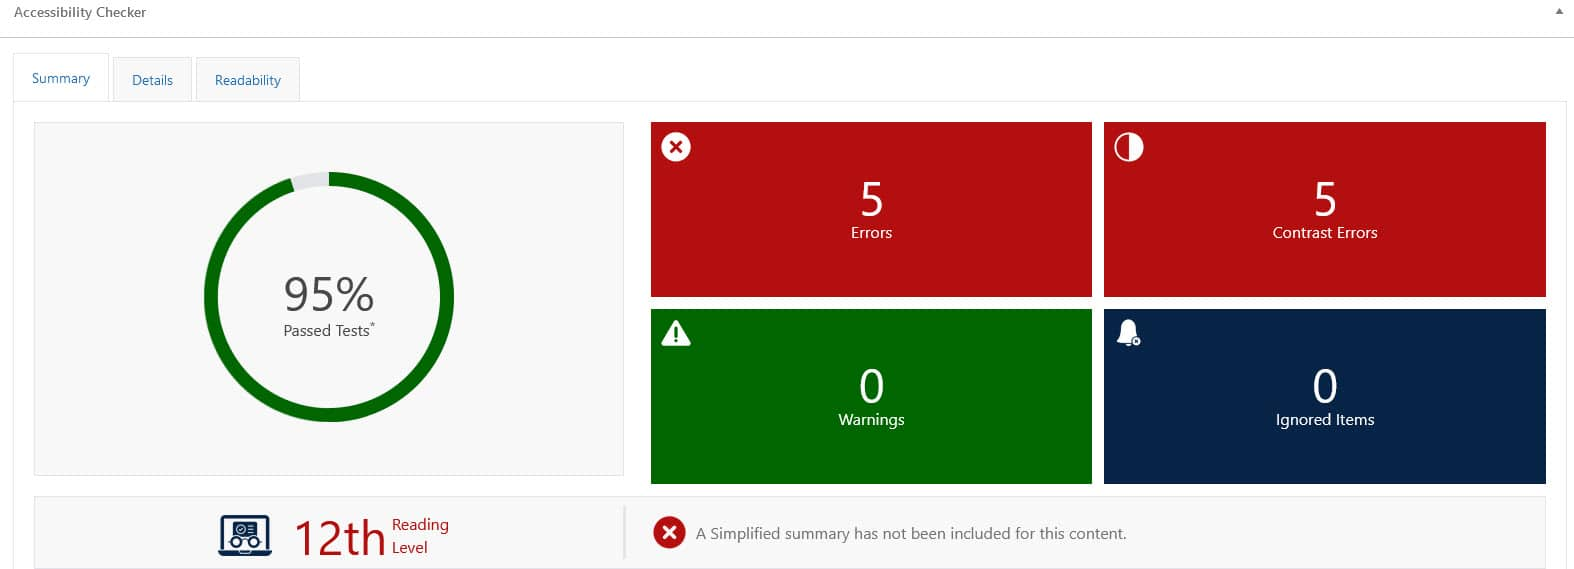
A score of 95% is great!
You’ll note that there are also 5 errors which are explained in the Details tab.
In this example, there were 5 broken skip links and 5 contrast errors that needed to be manually checked.
But the plugin also reports a 12th grade reading level, so this page did not pass the readability test.
WCAG at the AAA level requires a simplified summary that is at the 9th grade level or below.
Note I did say “AAA” level, so this is not relevant for Level AA compliance. However, I am mentioning it here so you get in the practice of keeping your content readable and “simple.”
The plugin lets you compose and add that simplified summary, which appears after the content.
Image Long Alternative Text
This plugin also reports images with excessive ALT text that could annoy users or be too long for the screen readers.
It quickly identifies this issue on a page-by-page basis and reports it while you are editing a page. That makes it simple to fix!
I like this plugin so much, that I upgraded to Accessibility Checker Pro (aff link) , which has additional features such as full-site scanning, priority email support, and a centralized list of open issues that you can tackle as time permits.
Screen Reader Text Format Plugin
Download Screen Reader Text Format Plugin
This plugin adds a screen reader only text format control to the block editor, which lets you markup certain types of text content.
For example, strike-through text can be seen visually, but a screen reader will not mention it.
Or perhaps you have a button that says “Learn More.” In this case, you could add screen reader only text to provide a more descriptive link.
See an example of why you might need to use screen reader text.
As of September 2024, this plugin has not been tested with the last 3 major releases of WordPress. The last update was a year ago, but the plugin still works and I’m still using it. If an update isn’t forthcoming over the next few months, I will review alternatives and update this post if I find a suitable replacement.
This plugin was finally updated towards the end of 2024, and is a great tool to help you make a more accessible WordPress website.
Need Help?
If you feel overwhelmed or have any questions, please feel free to contact us.
Remember, if you run a WordPress site, you’ll want to learn how to check your site periodically to ensure that it is ADA compliant.
Wrap Up
I hope that this document has helped you understand how to make your WordPress website accessible.
We discussed the WCAG guidelines and recommendations provided for ADA compliance.
And you were provided with a checklist to help guide you through your site to identify issues that need to be fixed.
I also demonstrated a few helpful tools that I use. But there are many others out there that may suit your purpose, too.
Next you’ll want to make sure you improve website accessibility for low vision users.
I will continue to update this document as more relevant data, tools, and guidelines are forthcoming.
In the meantime, please feel free to post your questions and comments below and I will make every attempt to help you.
Special Thanks
I want to give a special thank you to MaAnna Stephenson of BlogAid and Marcy Diaz of Amethyst Website Design for their help with reviewing, contributing to, and editing this document for completeness.
Their help was invaluable to me as I assembled my research and documentation for this post.