Moving from HTTP to HTTPS: SSL Migration Case Study

This post is the third installment in our SSL series. This case study discusses the tasks that we needed to do when moving from HTTP to HTTPS and what needed to be done after the SSL migration.
While this post is written primarily for WordPress users, the instructions and concepts will be helpful to non-WordPress users, too.
In Part One of our SSL series, you learned what SSL is and why you might want to install it on your website.
In Part Two, you learned the four steps to configure HTTPS and resolve mixed content warnings.
However, the work doesn’t stop once you’ve successfully completed your SSL migration.
You need to remember to tell Google and Bing about the site change.
And if you’re using 3rd party tools such as Disqus, Pingdom, Sucuri, or Cloudflare, you’ll need to let them know as well.
None of this work is difficult, but it’s easy to overlook.
This purpose of this post is to give you an idea of what we needed to do when moving from HTTP to HTTPS. This case study outlines steps we needed and a checklist of action steps to take after the migration was complete.
You’ll want to create a checklist customized for your website, too. Make sure to take inventory of all third-party services, plugins, and tools you use to manage your website and add them to your list.
So let’s get started!
Moving from HTTP to HTTPS
Steps that we took once we installed our SSL certificate include the following:
Tell WordPress to Use HTTPS
Force All Posts and Pages to Use HTTPS
Resolve Mixed Content Warnings
Set Up Cloudflare and SSL
Add Site to Google Search Console
Add Site to Bing Webmaster Tools
Migrate Disqus Comments from HTTP to HTTPS
Recover Social Shares
Update Other Platforms
Tell WordPress to Use HTTPS
A few simple setting changes and you’re WordPress site will be ready for HTTPS. Learn more in Part Two of our SSL series.
Force All Posts and Pages to Use HTTPS
It’s important to redirect the prior HTTP version of your pages to HTTPS. You can learn how to do this in Part Two of our SSL series.
Resolve Mixed Content Warnings
This is probably the most difficult task you’ll encounter when moving from HTTP to HTTPS. If any file or image on a web page is not being served securely, the lock icon will not display in the browser bar. Fortunately there are tools and a few tips to help you in our earlier article.
Set Up Cloudflare and SSL
Not all websites run under a Content Delivery Network (CDN) such as Cloudflare. If you are not on Cloudflare, you can skip this step. If you’re on another CDN, refer to that CDN’s instructions for integrating SSL.
If you are running your website under Cloudflare, there are a few issues specific to SSL and Cloudflare that you should know about.
In an earlier post we showed you how we greatly increased performance by putting our website on the Cloudflare CDN. However, when we activated SSL on our site, we ran into a few obstacles.
At the time, my site was on A2 Hosting.
I purchased a GlobalSign SSL certificate which was easily installed with one-click. Upon activation of the SSL, I discovered that Cloudflare with SSL is not supported through A2 Hosting cPanel.
In order to complete the migration and test moving from HTTP to HTTPS, I had to deactivate Cloudflare in cPanel. What this means is that I had to remove the website from Cloudflare in cPanel. Next I had to create an account at Cloudflare and then add the website under the free plan.
I needed to ensure an encrypted connection between my site visitors and Cloudflare, and from Cloudflare to the A2 hosting server. This was where things got tricky. I knew that I had to connect my SSL with Cloudflare to complete the SSL migration to HTTPS.
I researched Cloudflare’s website for articles that would guide me on the best (and most affordable) course for my business. And what I discovered was I could sign up for the free Universal SSL and choose one of the Cloudflare SSL options. Depending on your business needs, you’ll want to investigate each of the options.
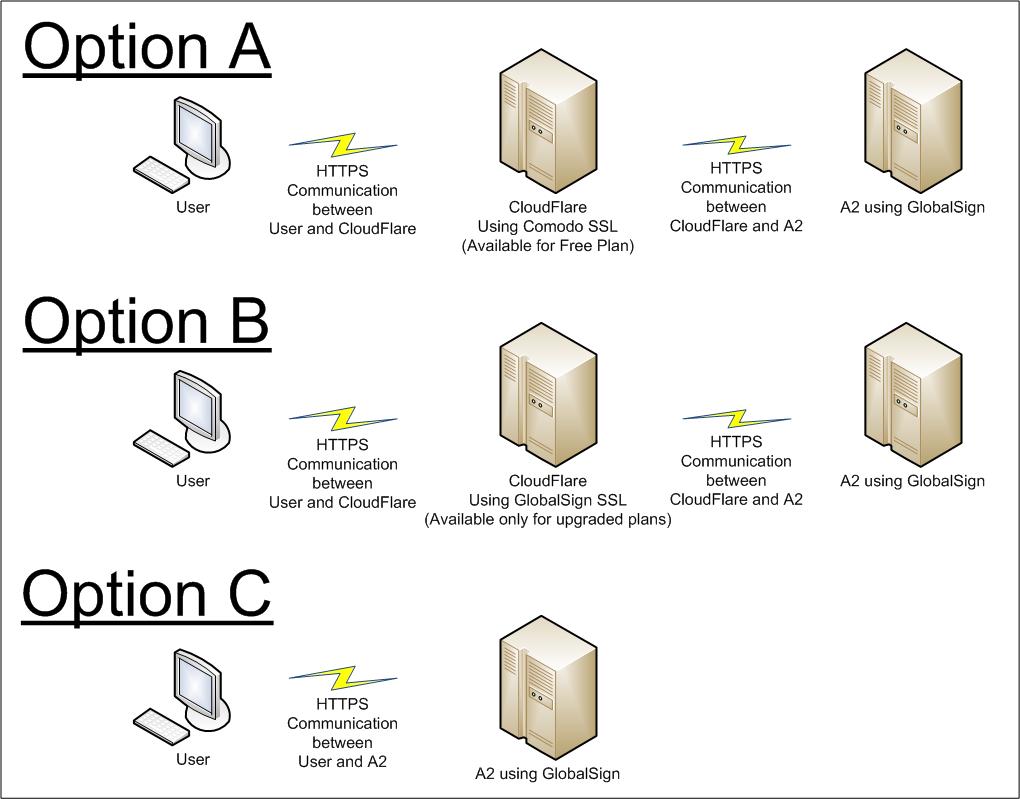
Option A: This free option is Full SSL (Strict) which encrypts the connection between site visitors and Cloudflare, and from Cloudflare to the A2 Hosting server. This option requires a valid, non-expired SSL certificate that has been signed by a trusted certificate authority and installed on the A2 Hosting server. But since this option is free, the Cloudflare Comodo certificate will show in the browser.
Option B: This option is the upgraded business plan for Full SSL (Strict). Under this plan Cloudflare will consistently show the same certificate as in the origin server. In this case, the GlobalSign certificate will show when a user requests to view the certificate.
Option C: If your site is not on the Cloudflare CDN, your GlobalSign certificate will display in the browser bar.
To illustrate your choices, refer to the diagram below which was created by my colleague, Woei Yu Choo. Woei Yu is also a guest contributor to this blog and wrote Part 1 and Part 2 in our 3-part series on SSL.

Ideally I wanted my certificate to show in the browser bar when a website visitor viewed the certificate in the browser. However, because my website is on Cloudflare’s free plan, I was unable to upload my SSL certificate to Cloudflare. So I signed up for Option A with the understanding that Cloudflare’s Comodo certificate will display to my website visitors.
Once everything was properly installed, visitors could see the SSL lock icon in their browser.
Add Site to Google Search Console
Remember, when moving from HTTP to HTTPS, the URL protocol changes. So you now have a new website with a new address. The search engines also need to be told about this new website.
Make sure you add your site to Google Search Console.
Then generate a new sitemap and submit it to Google.
Add Site to Bing Webmaster Tools
Make sure you add your site to Bing Webmaster Tools by following these instructions.
You will also need to add your sitemap to Bing Webmaster Tools. While Google still has the market share on search, there is still value in making sure your site can be found by Bing, Yahoo, and other search engines.
The Bing Webmaster Dashboard is quite easy to learn and navigate, so take some time to become acquainted with it.
Migrate Disqus Comments from HTTP to HTTPS
Note: If you are not using the Disqus plugin commenting system, you may skip this section.
If this is the first time you’ve changed the URL protocol on your website, you may be wondering what happened to your Disqus comments?
Just like Google, Disqus needs to know about your new address so that all the pages with comments work properly. No worries! Disqus has a migration tool that helps you to fix this.
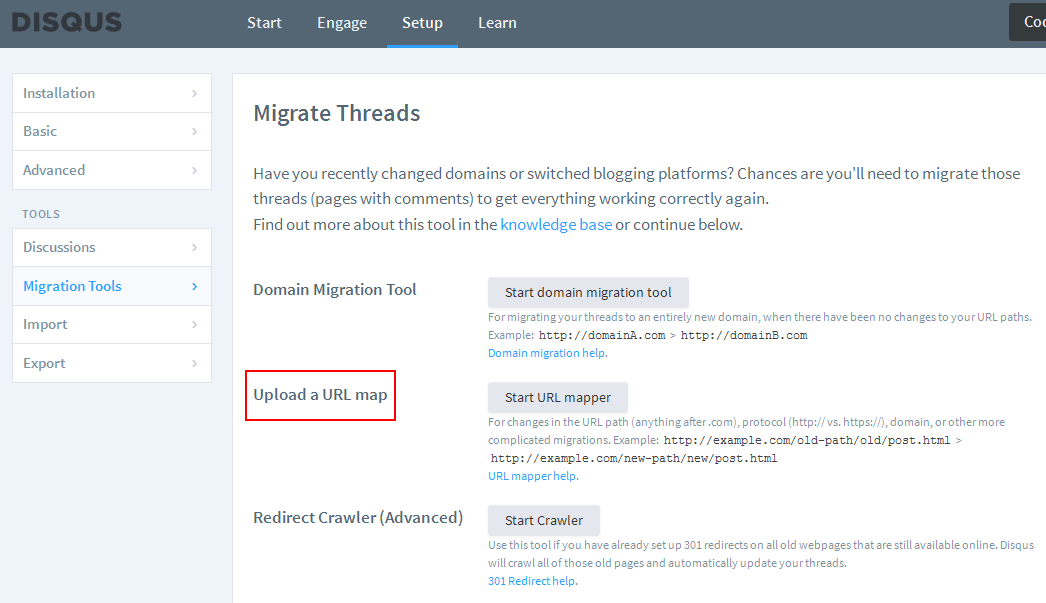
Log into your dashboard at WordPress.com and choose Migration Tools. Then click on Upload a URL Map and follow the steps.

You’ll be walked through a procedure to download a URL list of all of your posts from the Disqus forums. The file is a CSV file that once downloaded, you can easily open and edit in a program such as Microsoft Excel.
You’ll need to map the old URLs that are provided. What I did was copy and paste all of the old URLs in the first column into a second column. Then I did a global find and replace of http to https in the second column only.
Once done, you can upload the URL mapping to Disqus. It can take up to 24 hours for the changes to take effect, but you can see your comments gradually reappearing.
Recover Social Shares
Will your social sharing plugin be able to detect that your website address has changed? If so, make sure you retrieve the share counts from your prior website address (HTTP) and merge them with your new website address (HTTPS).
Update Other Third-Party Platforms
If you are using other third-party platforms such as Pingdom, Uptime Robot, Sucuri, etc., make sure you log in and update the website protocol.
Make sure to update all of your social media platforms to show the new HTTPS address, too!
In Summary
Every website has a unique set of challenges to identify and correct when moving from HTTP to HTTPS. Make sure you take the time to do an inventory of your website so that nothing is overlooked.
Once you’ve installed your SSL certificate, tell WordPress about it and resolve your mixed content warnings. Then create the appropriate redirects so that the HTTP version of your website pages are redirected to the HTTPS version.
Make sure your Content Delivery Network (CDN) is configured to run with SSL.
Update other third-party services such as Pingdom and Sucuri.
Let Google, Bing, and the other search engines know about the change. Make sure to upload a new sitemap for your website.
Migrate Disqus comments, if applicable.
Make sure to recover your social shares. Remember, those counts were for the HTTP version of your website.
Adding SSL to your website is a wise move to make and is mandated by Google as of this writing. Having an SSL protects sensitive visitor data that might get submitted on your website, readies your site for e-commerce, and offers a slight ranking boost.
While it might seem like a daunting task, having a plan in place will help you ensure a smooth migration.
Photo credits: Fotolia and Pixabay


