Optimize WordPress: 13 Actionable Tips to Improve Performance
This blog post will look at simple ways you can optimize WordPress and improve your site’s performance.
But before you know what to optimize, you’ll have to know where the bottlenecks are.
Below is a list of 13 actionable tips to help you improve your website’s performance.
1. Check Your Site Speed
For the past few years Google has warned that if your site doesn’t load in 2 seconds or less, you will lose traffic.
If this is the case for you, check out the online testing tools below that will help you get a handle on improvements you can make to optimize WordPress.
Some of my favorites are:
Sucuri Load Time Tester: Test how long it takes to connect to your site and time to first byte (TTFB). Learn how long it takes for content to be sent back to the browser.
WebPageTest.org: WebPageTest is my go-to tool for testing TTFB as well as bottlenecks and slow-downs on a website.
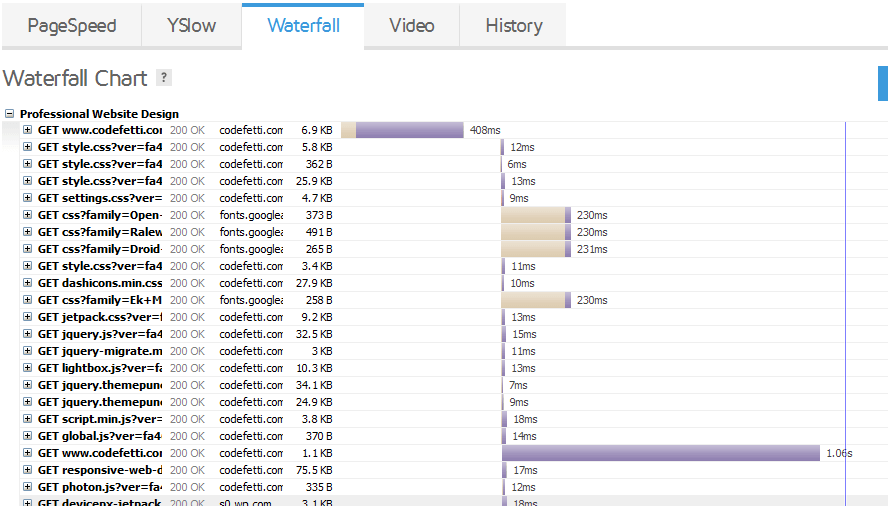
GTMetrix: Analyze site speed and get actionable recommendations to optimize it. What’s eye opening here is the Waterfall view. You can easily track bottlenecks by investigating the slow-loading site resources.
With the help of the Waterfall metric I discovered that by disabling Gravatars on my site I improved YSlow from a C grade to a B grade. So overall we achieved a 3% performance boost.
Another place where we took a performance hit was with custom CSS and Google fonts. As much as I wanted to dress up my contact form with custom CSS, it wasn’t worth the extra page load time. So I deactivated Jetpack’s Custom CSS module and achieved a notable performance boost. And because Jetpack itself is resource-intensive, I’ve deactivated and removed it from my site completely.
It’s a really good idea to use more than one testing tool because metrics and methodology of each tool will likely affect your performance grade. In other words, where you may score an “A” for page speed with GTMetrix, you may score a “B” with Sucuri.
Additionally, run your performance tests at different times throughout the day and take the average of those results. You’ll be amazed at what peak traffic on your web host server can do to your website performance.
Implementing even a few of the recommendations can help optimize WordPress and improve your site performance.
2. Check Your Hosting Provider
In the past five years I’ve moved hosting companies 3 times. Moving from one host to another is a pain yet sometimes you reach a point where you just don’t have a choice.
As I discovered early on, crowded shared servers can bring a WordPress site to a crawl. And sometimes hosting providers just don’t have the optimal environment for running WordPress.
My initial hosting provider was Bluehost. At the time, it was an affordable solution for my startup. However, on their basic shared hosting plan my WordPress site struggled. After exhausting many troubleshooting tips and speaking with Bluehost technical support, Bluehost finally convinced me to upgrade to their Pro Web Hosting for a few hundred bucks.
When the upgrade failed to improve my website performance, I asked for a refund and then switched to Hostgator. The site ran more efficiently, but the EIG takeover of many hosting companies and the ultimate buyout of Hostgator crippled many websites, mine included. I tried to hang in there as the data centers were merged and migrated.
But after months of extensive downtime I decided to switch to A2 hosting (affiliate) in January 2014. I’ve been more than happy with A2 Hosting’s service and support. Their SSD servers are well-equipped to handle WordPress sites.
There are other excellent hosting companies as well as companies that specialize in managed WordPress hosting. Do your homework and find the right solution for you. Your hosting provider should have the proper environment to help optimize WordPress.
3. Update Plugins, Themes, and WordPress
Make sure that the latest versions of your plugins, themes and WordPress itself are up-to-date. WordPress updates often include performance enhancements as well as security fixes, so it’s crucial to stay on top of every new update.
However, if your site hasn’t been updated for awhile and you are behind more than one update, you need to take care to not break your site.
Learn practical strategies for updating your WordPress plugins, themes, and WordPress itself.
Doing some basic housekeeping here can go a long way to helping you optimize WordPress.
4. Delete Unused Plugins
Each time your site loads WordPress must query a database to see whether a plugin is active. So make sure that you delete any deactivated and/or unused plugins.
Also, remember plugin authors come and go, and with that, your support goes, too. Don’t get too tied to a plugin because a broken and unsupported plugin might cause you redesign issues down the road.
Additionally, inactive plugins that are not kept up-to-date create a point of vulnerability where hackers can access your site.
Finally, do you really need all of those plugins installed? Look at each plugin with a critical eye and if you can live without it, get rid of it.
How to Delete Unused Plugins
Via WordPress Dashboard
You can delete the plugin through the WordPress dashboard. Deactivate the plugin, then delete it.
Via FTP Manually
If you don’t have access to the dashboard, you can manually delete the plugin via FTP. Log into your site via FTP and rename or delete the plugin folder.
You can find your plugin folders under wp-content.
5. Delete Unused Themes
Your site is only using one theme plus a child theme. So once you’ve decided on that theme, delete the others. You can always reinstall a theme and activate it if you want to switch your design.
However, it’s recommended that you keep one of the WordPress default themes installed for troubleshooting purposes. Many times it’s necessary to deactivate your theme and reactivate a different theme to try and track down problems.
To delete an unused theme, log into the dashboard and navigate to Appearance>Themes. Click on Theme Details. You will find a Delete link in the lower right corner. Simply click that link and the theme will be deleted.
Note: the Delete link will not display for an active theme so you can’t accidentally delete a theme that’s in use.
6. Beware of Backup Plugins
A backup plugin that is scheduled to run during peak hours of the day can slow down your site. Some backup plugins (even Backup Buddy) will fail to run on an overloaded server. Other things to watch out for:
- Make sure you’re not running more than one backup plugin as conflicts may arise.
- Backup plugins can also have conflicts with other plugins which can impact your site performance or even break it.
- Monitor your backups and make sure they start and complete successfully.
- Schedule your backup to run off hours.
- Periodically log in to WordPress and run a manual backup.
- And every now and then test to make sure that your backups are good.
I highly recommend UpdraftPlus. I use it on all my sites and have found it to be efficient, reliable, and complete.
7. Install a WordPress Caching Plugin
Caching creates a copy of your website and serves up local HTML documents to your users. Caching also saves on bandwidth by compressing pages before sending them to a user’s browser.
I have personally noticed a significant improvement by installing WP-Fastest-Cache and have since installed it on all the sites I develop and maintain.
Some hosting companies have guidelines and policies in place that can help optimize WordPress on their servers, so make sure you contact them for additional help.
But if you don’t mind shelling out a few bucks, premium plugin WP-Fastest-Cache-Premium will make your website soar! Once you’ve installed the free version, you can upgrade to the premium plugin via the settings page.
8. Reduce the Number of Posts Shown
If you have lots of posts, you might want to consider reducing the number of posts shown. Doing so will give your website load time a performance boost.
Here’s how: Log into the WordPress dashboard and go to Settings > Reading > “Blog pages show at most.” Then change displayed posts to 5 or fewer.
9. Watch Those Widgets!
Widgets are cool and can add great functionality to your website, but choose them wisely. As I worked through optimizing my site, I found that I had two widgets that were impacting my site more than everything else combined.
The first widget was a “Page” widget, which listed out all my pages in a menu. The second widget was a Twitter feed that showed my most recent tweets. While it was nice to have the Twitter feed showing in my blog, it wasn’t worth the extra time it took to download my tweets.
So be mindful of the various social feeds that your website needs to connect to and test whether they slow down your site.
10. Optimize Your Graphics and Media Files
By reducing the file size and compressing your images and videos, your pages will load faster. I recommend an online compression service such as Squoosh.app or Tiny PNG instead of WordPress plugins like WP-Smush. Using one of these services reduces the need to add one more plugin. Plus it reduces resource consumption on your server.
11. Use SEO-Friendly Permalinks
A permalink is simply the URL of a WordPress page. Your permalink structure should be in place before you publish your website, and it’s best to keep that same permalink structure going forward.
Google and Bing recommend descriptive URLs for your web pages. By using short and descriptive keyword-rich URLs, the search engines will be able to more easily crawl your site. These types of permalinks are known as “pretty” permalinks.
The default permalink structure in WordPress is the “ugly” permalink. That structure displays your URL as “http://sitename.com/?p=23.”
To set up a pretty permalink you need to change your permalink structure to include the post name. To change this setting, go to your WordPress dashboard and click Settings, then click Permalinks. Click on the Post Name option and note that custom structure now shows “/%postname%/.” You now have “pretty” permalinks. That is, you have URLs that are readable, that are remember-able, and that have higher SEO rankings. For example: “http://sitename.com/post-name.”
A Word of Caution
If you have an existing site and you change your permalink structure, make sure to set up 301 redirection using WordPress SEO or a redirection plugin. This will properly route your traffic from the old URL to the new URL. If you log into Google’s Search Console (formerly Webmaster Tools) and notice 404 errors, make note of the URLs and set up the redirection.
12. Repair and Optimize Your Database
Repairing and optimizing your WordPress database are necessary housekeeping tasks that will keep your WordPress site in tip-top shape. This is important because the more posts you write, the more your database grows. Post revisions, theme and plugin settings as well as pending or spam comments all take up space in the database. Over time, the database can become bloated and fragmented, which greatly impacts website performance.
You can repair and optimize your databases fairly easily through either phpMyAdmin or a WordPress plugin.
Using phpMyAdmin
You’ll have to do this on your server. Make sure you backup your databases first. Then run a repair and optimize on all tables in all your databases. You can also contact technical support at your hosting provider for assistance.
And WPMU DEV also has published a great list of tips for cleaning up your WordPress site including basic SQL commands that can help optimize WordPress.
Using a Plugin
I use and recommend WP-Sweep for deleting post revisions (which can quickly accumulate!) as well as any drafts or comments that are spam, unapproved, or in the trash bin.
Remember to check whether any plugin you choose is compatible with your current version of WordPress.
13. Activate a Content Delivery Network (CDN)
A content delivery network delivers web content based on a user’s location. In other words, a web page is delivered from a content delivery server closest to that visitor. Because the content is served based on locale, the website loads up fairly quickly, which dramatically improves the user experience.
Many web hosting companies have partnered with Cloudflare to offer free activation of CloudFlare’s CDN for their web hosting clients.
I recommend that you sign up with an account directly at Cloudflare. And while the free account is better than nothing, I strongly recommend the Cloudflare Pro plan for $20/month. This plan puts you behind a web firewall and let’s you define up to 20 rules.
Several years ago, we activated the free version of Cloudflare to help reduce page load time for our website (we have since upgraded to the Pro plan).
The performance boost was immediate and it didn’t take long at all to set it up. You can learn more about Cloudflare’s CDN including what it is and how to set it up in our case study.
In Summary
Hopefully implementing just a few of these 13+ actionable tips will help you to optimize WordPress.
- Check your site speed and pinpoint the bottlenecks.
- Make sure your hosting provider is adequate.
- Update plugins, theme, and WordPress itself.
- Delete unused plugins.
- Delete unused themes.
- Ensure your backup plugin is not scheduled to run during peak hours.
- Install and configure a caching plugin.
- Limit number of posts shown.
- Test whether widgets are slowing down your site.
- Optimize your graphics and media files.
- Use SEO-Friendly permalinks.
- Repair and optimize the database.
- Activate a CDN such as CloudFlare.
I hope these tips have been helpful!
Do you have any other tips that you’ve discovered to help optimize WordPress?