Use WP Portfolio to Build a Better Portfolio
This post will show you how easy it is to use WP Portfolio to build a better portfolio.
If you’ve ever imported an Astra Starter Site, you’ve probably seen a very crafty and eye-catching portfolio of sites from which to choose.
Did you know that you can easily create your own beautiful website portfolio just like that one with WP Portfolio plugin?
And I’ll show you how!
Now I Use WP Portfolio
Recently I discovered WP Portfolio by Brainstorm Force, the same great company behind the lightening-fast Astra WordPress theme.
I found it to so easy to use! And the portfolio was better-looking, too!
If you’ve been wanting to build a portfolio for your website, read on and learn how to use WP Portfolio!
Below is a list of topics so you can easily jump to sections of interest:
WP Portfolio Topics
WP Portfolio General Settings
Import Starter Sites
WP Portfolio Style Settings
Create Portfolio Items
Using Snagit
Optimize Portfolio Images
Portfolio Shortcodes
Apply a Filter to Your Portfolio
Troubleshoot
Once you’ve purchased and installed the plugin, take some time to explore the settings.
WP Portfolio General Settings
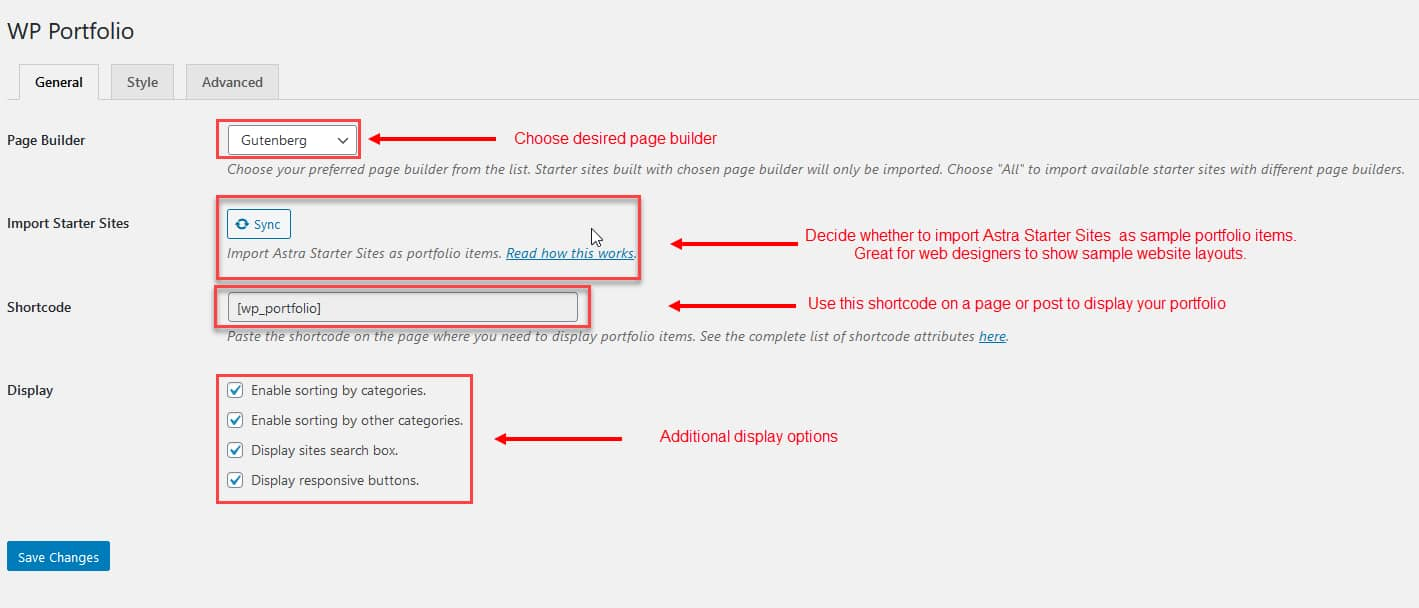
From the dashboard, click on WP Portfolio > Settings.
Then under the General tab:
- Choose your desired page builder.
- Decide whether you want to import the Astra Starter Sites as portfolio items.
- Note the shortcode that you use in the page or post to display your portfolio.
- Decide whether you want a search box, sorting, and responsive buttons. I normally keep all of these at their defaults.
- Click SAVE CHANGES.
Let’s take a deeper look at the Import Starter Sites option.
Import Starter Sites
This setting will bring in all of the Astra Starter Sites and merge them with your portfolio items.
If you’re a web designer, you might want to bring these sample sites into your portfolio so your customers have additional website samples to view.
It’s a white-brand feature and it’s perfectly fine to do so.
As a web designer, my portfolio is constantly changing. Customers come and go, they close their businesses, they redesign their own sites.
By syncing your portfolio with Astra Starter Sites, you’ll provide another set of sample sites for your clients.
So depending on how many choices you want to give your customers, it’s an option that can beef up your portfolio.
WP Portfolio Style Settings
Next review the Style tab.

Decide how many columns you want as well as number of items per request.
The portfolio is actually what’s known as an infinite scroll and will keep loading all of your portfolio items in chunks.
So since I’ve specified 15 items per page, it really means 15 images load at a time.
You might need to experiment with this setting to see what gives the best user experience.
Most defaults here are okay, but you’ll likely want to change the Thumbnail Hover Style to “Image Scroll.”
This creates a consistent thumbnail image size and lets you take advantage of the nice visual effect that you see in my portfolio.
That is, when you hover over the thumbnail, the entire image scrolls like this:

When you click on the thumbnail, you’ll be taken to the associated URL for that item.
Build a Better Portfolio
Installing and setting up your portfolio is a breeze.
To me, the most time-consuming and challenging piece is creating high-quality portfolio items.
Let’s see how to do that next.
Create Your Portfolio Items
When you use WP-Portfolio, you can create four different portfolio types:
- Website
- Image
- Video
- Single Page
You can use any or all of these portfolio types and filter out the ones you want for a specific page.
And I’ll show you how to do that in just a bit.
But for now we’ll unpack how to build a website portfolio with WP-Portfolio.
How I Built My Website Portfolio
Since I’m a web designer, I wanted to create a portfolio that showcased the websites I’ve built.
When you create a portfolio, your thumbnail images needs to look consistent and clean. So it’s important that you create high-quality thumbnail images.
In my case, grabbing a snapshot of a website can be a problem when the website home page extends past the screen monitor.
In the past, I’ve had to take several screen shots and then paste them together to create one image that showed the entire home page.
But I’ve found a solution!
If you’ve had problems creating full-size image thumbnails for your portfolio, read on!
Using Snagit to Create Beautiful Portfolio Items
With Techsmith’s Snagit software, the problem is solved!
I can easily create a scrolling screen shot of any website using Snagit!
So if you need to grab high-quality images of websites for your portfolio, consider using Snagit.
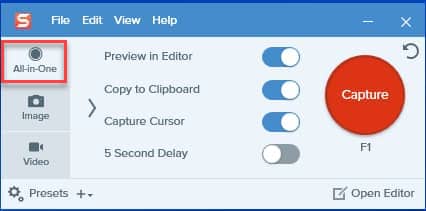
Once you’ve purchased and installed Snagit, here’s a quick look at what you need to do to grab a scrolling image:
- Launch Snagit
- Select All-in-One
- Click Capture
- Click Start
- Scroll the entire image
- Click Stop
Your image is now brought into the Snagit Editor where you can crop, edit, or clean it up.
Make Sure to Optimize Your Images!
Once done, make sure you run that image through an image optimization program such as Squoosh.
In the screenshot below, you can see I’ve snagged my website’s homepage.
Then I ran it through Squoosh.
The original image was 2.50MB but compression reduced its size to 387KB. That’s 85% smaller!
This is SUPER important if you want your portfolio page to be fast-loading!
Load Your Images into WP Portfolio
Now that you’ve created all of your portfolio items and optimized the images, you’re ready to load them into WP-Portfolio.
Here’s how.
From the WordPress dashboard:
1. Click WP Portfolio > Add New
2. Enter Title
3. Select Type from dropdown. In this case we’ll select Website.
4. Click Add Portfolio Item
5. Upload your thumbnail image
6. Enter the URL
7. Click Open in New Tab if you want to open the URL in a new browser window.
8. Or enter your Call to Action, which will appear on the bottom bar of the page.
8. Click Publish
Here’s a quick animation of how that’s done:
Add a New Page or Post with Your Portfolio Shortcode
Next, I’ll add and publish a new page using a shortcode block of [wp-portfolio] like so:
The only portfolio type I have so far is website.
So the following shortcode will load all portfolio items into the page.
[wp-portfolio] Website Portfolio Page
The screenshot below shows my website portfolio or you can see the live version here.
I’ve enabled sorting by categories in the plugin’s general settings.
So every one of my website portfolio items has a category of “website.”
And a second category I’ve added is the theme I used to build that website.
So that allows a visitor to further sort the portfolio items based on a particular theme.
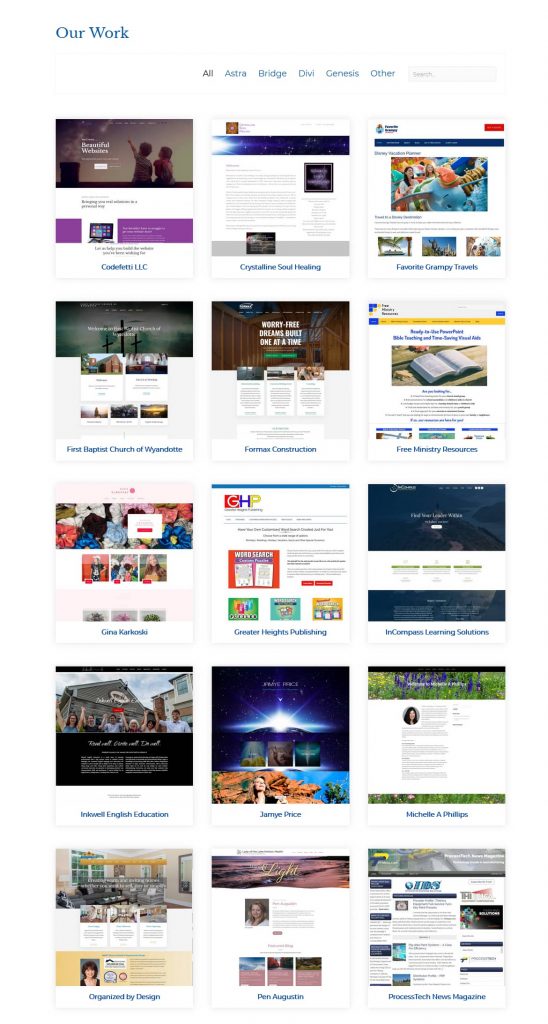
For example, if I clicked on Astra, only a list of Astra sites would display. Click on Genesis and a list of Genesis sites would display.
But what if I also had video or image portfolio items added to WP Portfolio?
I wouldn’t want to load those items into my website portfolio.
In this case, I’d need to apply a category or tag filter to make sure I only loaded website portfolio items.
Apply a Filter to Your Portfolio
You can read this post to learn how to get the category or tag ID from the item’s URL.
Let’s say the category ID for website portfolio type is “183.”
So I would add a shortcode block that looks like this:
[wp-portfolio categories="183"]And then WP Portfolio would filter out all portfolio items with a category ID of 183.
For me, that would include all of my portfolio types set to “website.”
For a complete list of WP-Portfolio shortcodes, click here.
The remainder of this post helps you troubleshoot.
Troubleshooting
Server Issues to Keep in Mind
This plugin gives you the opportunity to display your URL in a new browser window or within an iframe on your site.
An iframe is simply an inline frame element that allows you to embed another html page into the current one.
Current best practices recommend that you do not open a link in a new browser window, and so I left that option unchecked for my portfolio links.
That gave me the option to load the live websites into an iframe on my site.
And I loved how that kept the visitor on my site as you can see by the iframe example below!

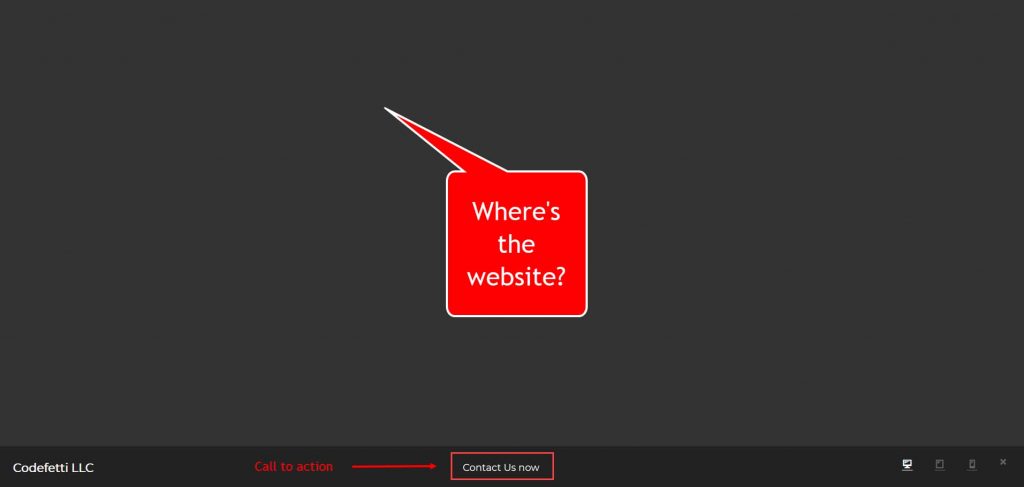
Some Sites Wouldn’t Load!
But then I ran into an issue where some sites would not load into the iframe and all that showed was an ugly black box:
I submitted a support ticket to the folks at Astra, and it took them a few days to sort it all out.
They reported back that the problem was how the different hosting servers have configured X-Frame-Options.
Now I’m not sure why some web hosts have this disabled and others don’t.
Sites hosted on SiteGround loaded into the iframe just fine but not A2 Hosting sites.
Since X-Frame-Options are so important for site security, I didn’t want to affect any policies the hosting companies had in place.
Even through WP-Portfolio support told me to contact the web hosting company and have a server administrator enable it, I’ve decided to hold off a bit until I understand what the ramifications are.
And I’ll be sure to update this post when I find out.
For now, I have opted to open the website URLs in a new window.
I just wanted to save you from jumping through hoops in case you encounter the same issue.
I hope you’ve found this post helpful.